Support
UNM Support:
You may contact vendor support by clicking the '?' icon in the top right of the Qualtrics Homescreen while logged into the application.
You may also contact UNM's support team by filing a ticket at help.unm.edu or emailing qualtrics@unm.edu.
NOTE: The SSO authenticator does not work with the Qualtrics Offline Application.
Qualtrics is an experience management platform commonly used for surveys. You can set up your surveys to require respondents to authenticate with Shibboleth before taking the survey. You can use these authentication methods to collect some information about your respondents. Shibboleth allows you to collect more information from your respondents than CAS.
Shibboleth allows users to authenticate via SAML. SMAL is 2-way connection and available on UNM Qualtrics facility. The Shibboleth SSO authenticator uses UNM logins to authenticate respondents. Please make sure to use your account with UNM NetID and associated password. UNM HSC email containing @salud.unm.edu will not work with UNM Qualtrics facility. Respondents can only their UNM NetID credentials to being authenticate.
Note: Shibboleth SSO type may not work properly with preview survey, it is advised to publish survey to check full functionality of this feature.
To Setup Shibboleth Authenticator:
- While editing your survey, open the Survey flow.
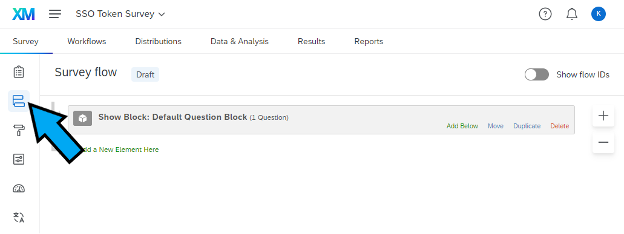
- Click Add a New Element Here or Add Below.

- Select Authenticator.

- Change Authentication Type to SSO. SSO Type to Shibboleth. And Select connection to UNM Qualtrics.

- Click Apply to save SSO configuration.

- After Applying these changes. Select Move to move the authentication block above all other blocks in your project at top. Click on Move and drag the Authentication block at top of your project.

- After moving Authentication block at top of your project. It is necessary to move your authentication block at top of your project or move all other blocks under authenticator block. If Authenticator block is not at top of your project, Authentication won’t be requirement for respondents.

- Click Apply once again to save your changes.
TO CAPTURE IDENTIFYING INFORMATION (OPTIONAL)
- Enable Capture respondent identifying info.
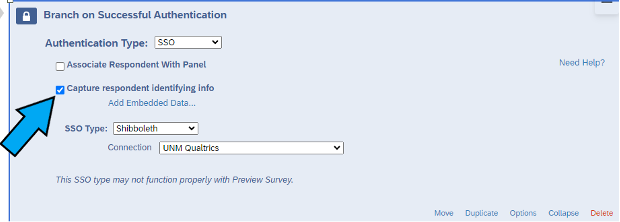
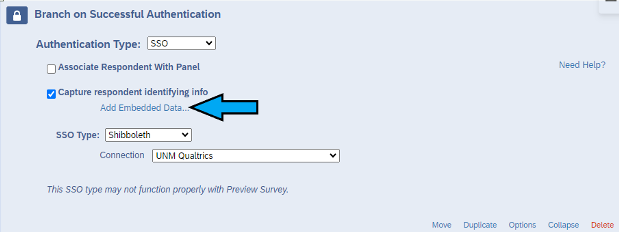
- Now, click on Add Embedded Data.
- Please input your embedded data filed name into “ Embedded Data to Set” text entry box to the left of the equal’s sign.
Insert the formal or friendly names of the attributes that are being passed via SAML into the “ Field From SSO” text entry box.
You can add and remove fields using plus sign (+) and minus sign (-) next to the Field from SSO text box.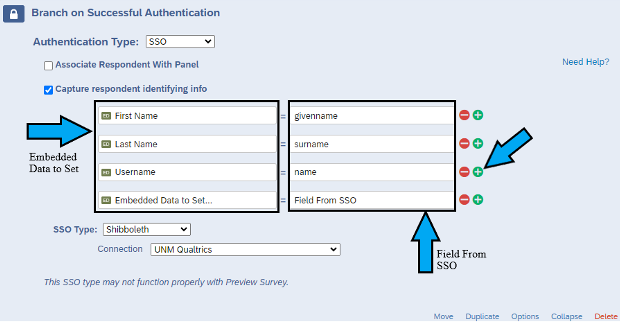
Note: Our Qualtrics team had added some pre-approved Field that you can use for “Field From SSO”. Attached below is the list of fields you can use. If user required to use other fields like UNM ID, please contact our IT team with questions at qualtrics@unm.edu
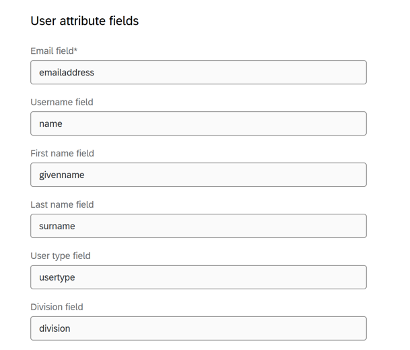
- Click Apply at right bottom corner to save your changes.
- Now, click on Add a New Element Here.
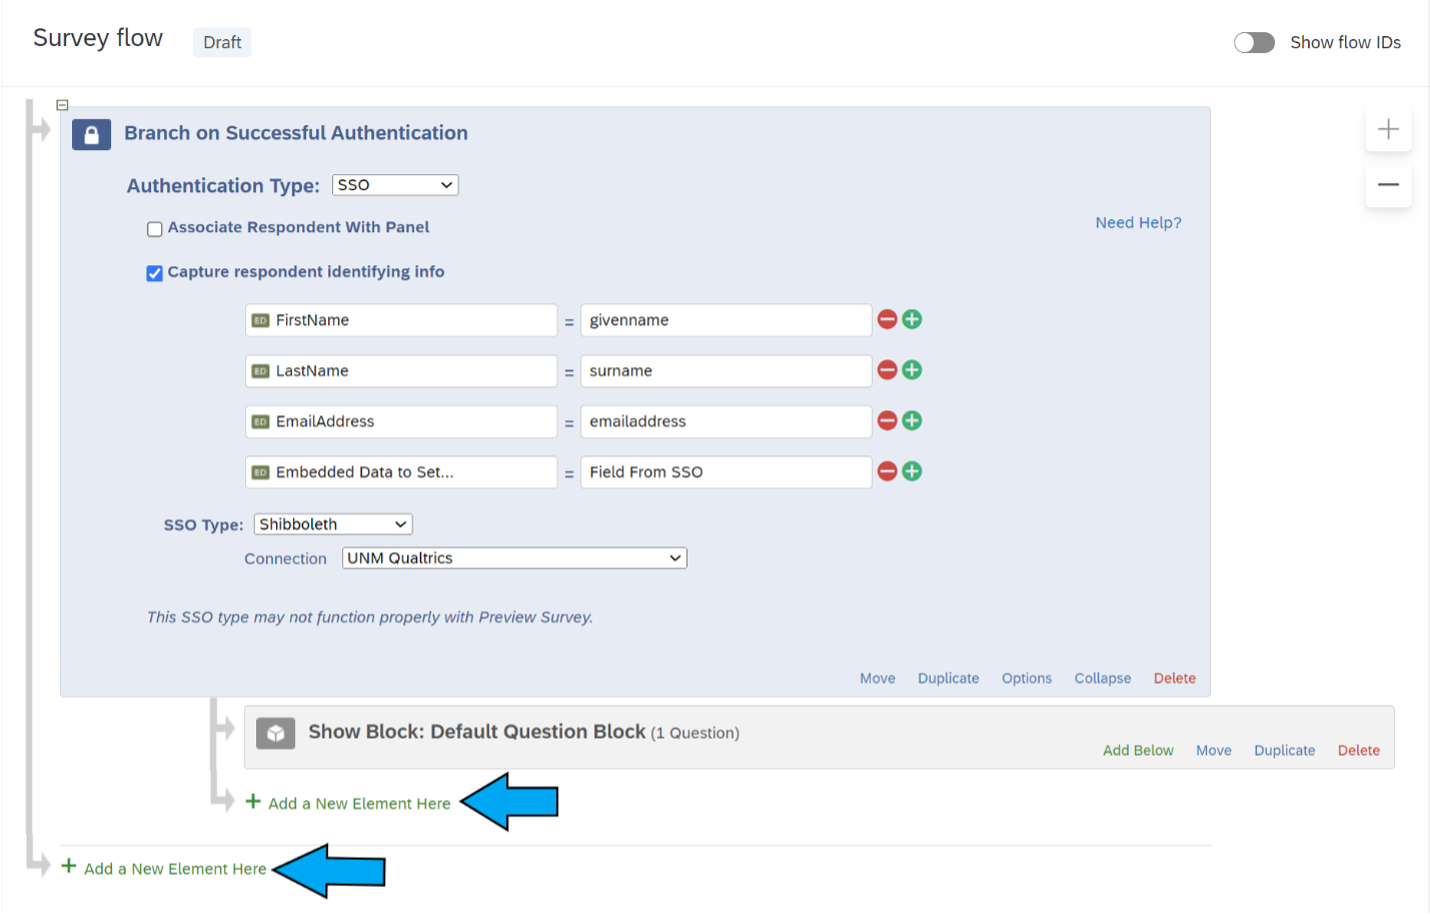
- Click on Embedded Data.

- Write the Data fields in the box.
 Make sure that filed name you have entered in the Embedded Data Set in Authentication should match in Embedded Data field.
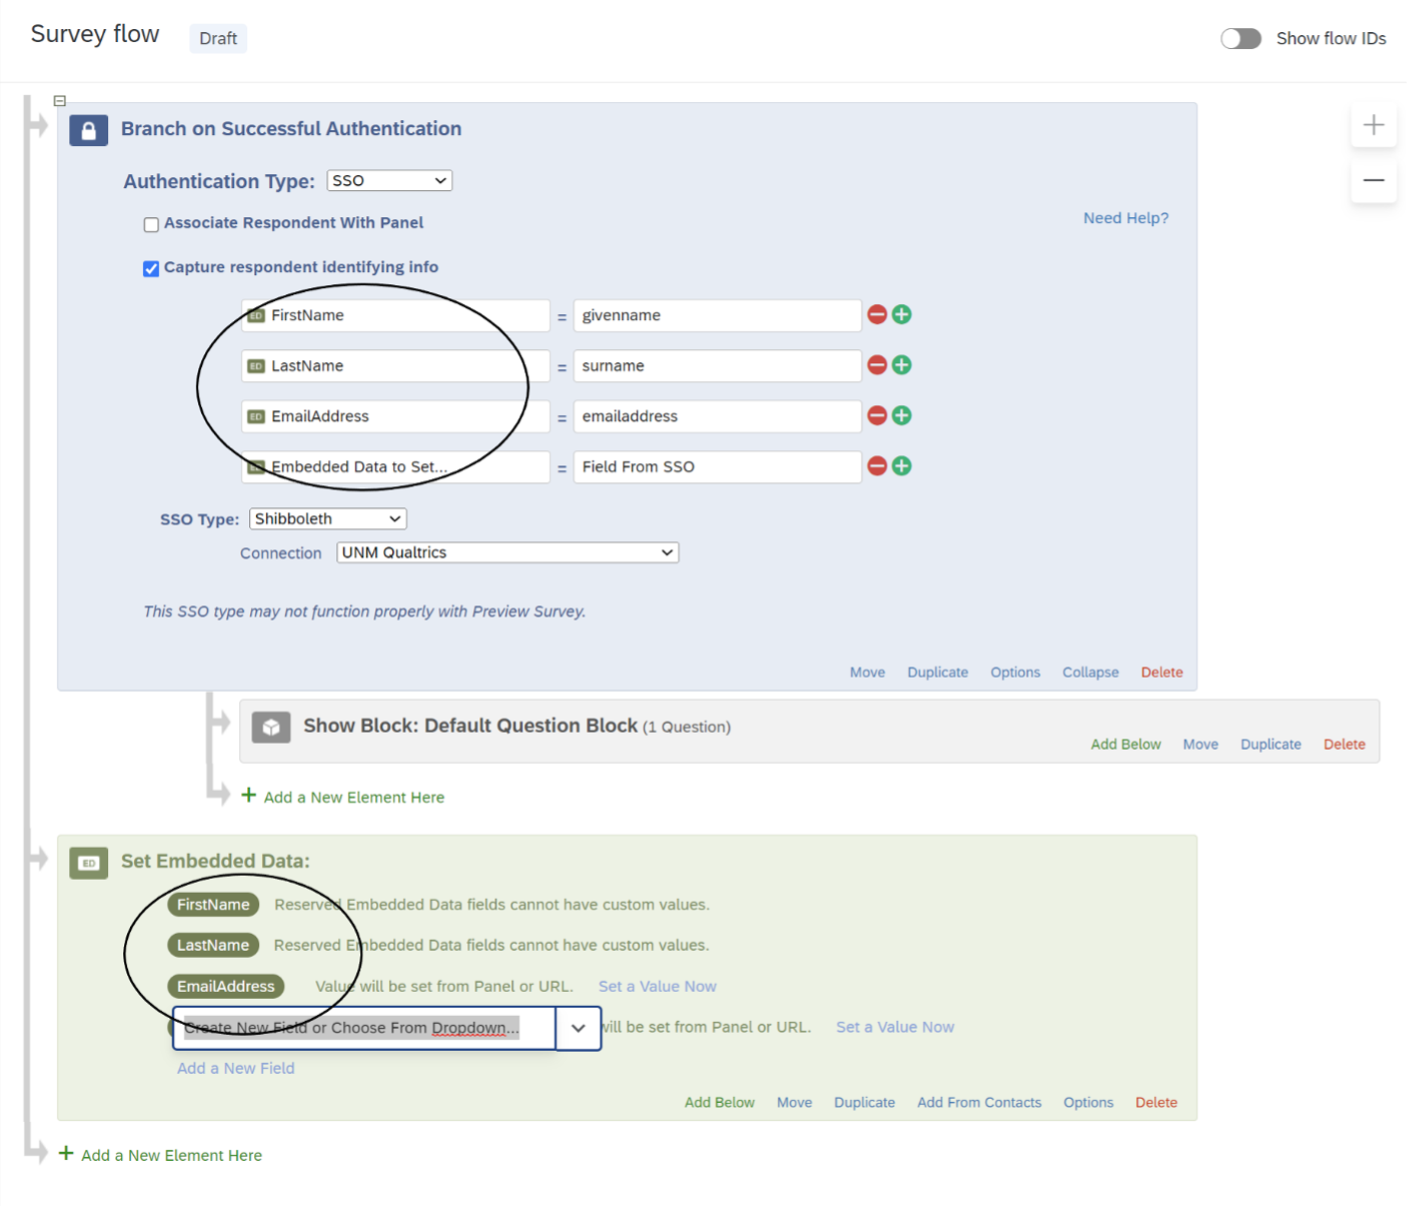
- With the help of Move option, move the Set Embedded Data tab above the Authentication tab.
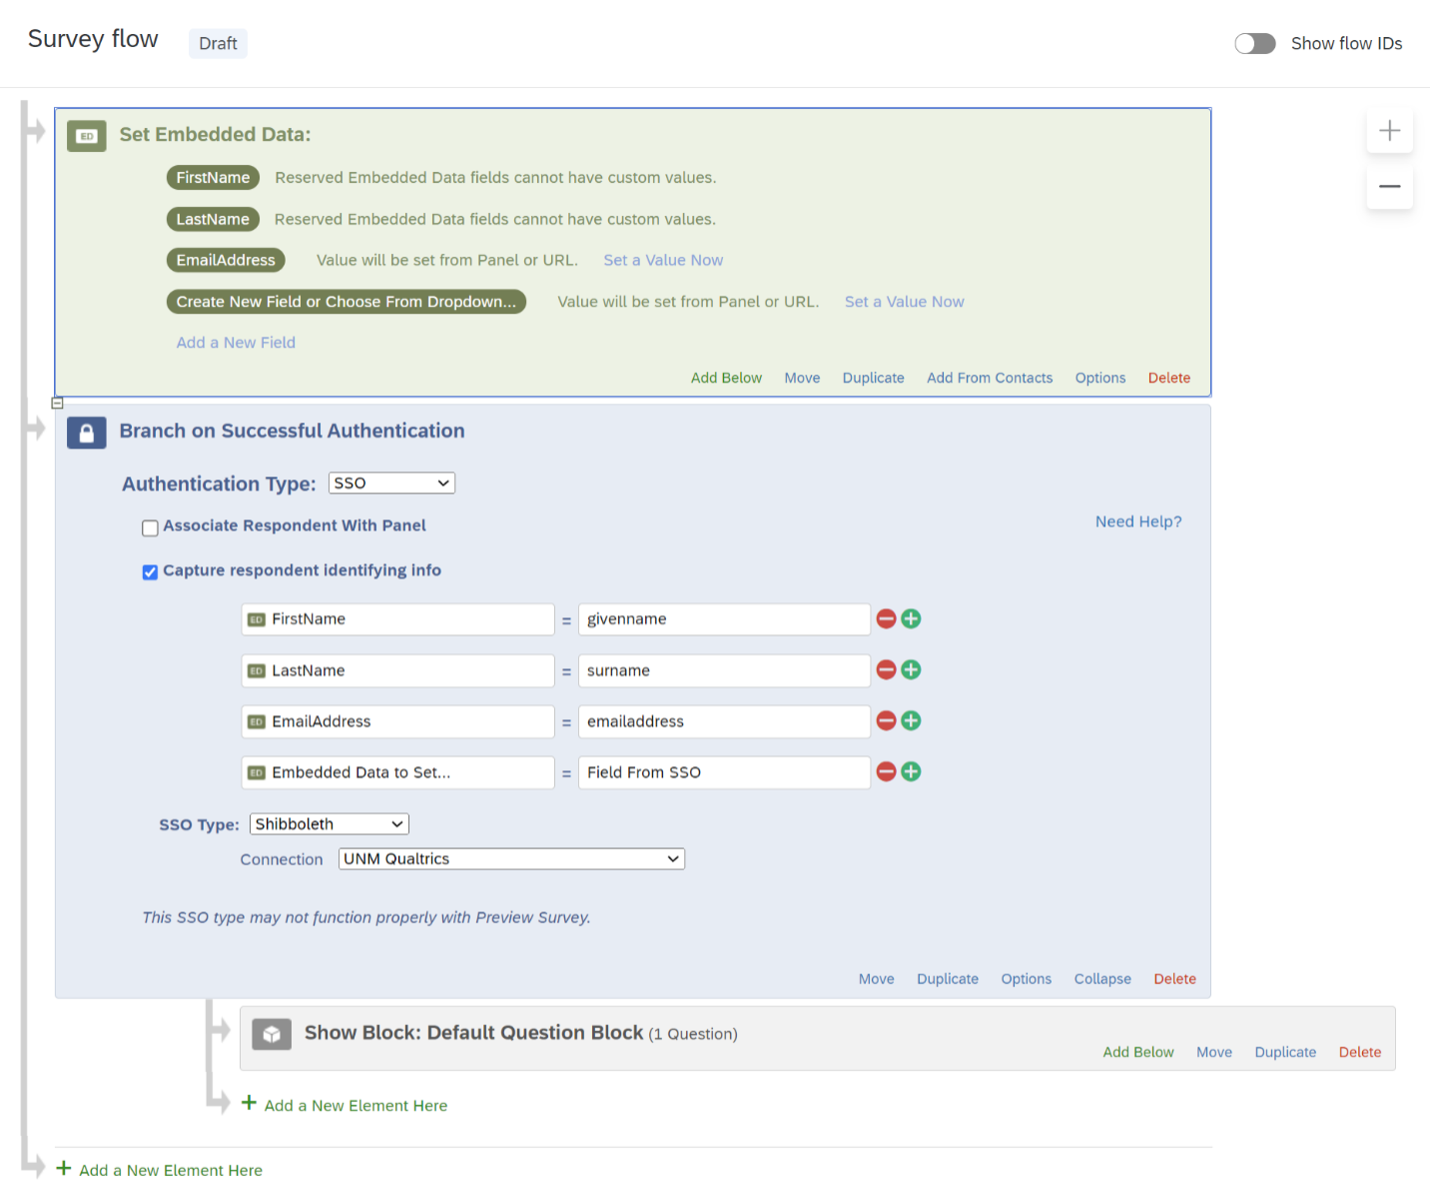
- Click Apply at bottom right corner to save your changes.
TO ASSOCIATE RESPONDENT WITH CONTACT LIST
By default, Shibboleth extension with SSO authenticators allow participants to take the survey multiple times. You can prevent this feature and restrict respondents to take survey only once by enabling Associate Respondent with Panel. This Option will force respondents to be a member of the selected contact list in order to take the survey.

Note: How to add contact list in personal library
- Click on the three lines at the top left corner of Qualtrics interface and then click on Directories.

- Click on the Create list located on right side.

- After Clicking on Create a list, enter your list name. Then upload a file or enter manual input.

If you have any questions about Qualtrics, please feel free to contact our IT team at qualtrics@unm.edu or open a help ticket at help.unm.edu.
UNM Qualtrics uses UNM's Azure AD and Multi-Factor Authentication (MFA) methods, like other systems on campus (e.g., LoboMail, O365 and Zoom). This authentication method provides more security and protection for our users, allows automatic sign-on if you are already logged into another UNM site that uses Azure AD, and provides more standardization and consistency when accessing multiple applications at UNM.
We recommend signing in to the UNM Azure AD site and making sure your phone number is correctly listed there and that you have more than one device/method set up, such as the Microsoft Authenticator Mobile app. This will ensure you can still access UNM systems if you lose one device. If you do not have a mobile device, see FastInfo 7823 for alternatives. For HSC users with SSO devices please refer to the " Using "Private/inPrivate/Incognito browser" to resolve Main Campus - HSC Azure AD Authentication Conflicts"
Step 1. Go to https://unm.Qualtrics.com
Step 2. Enter your UNM Net ID to Login.
If you are already logged in to UNM systems via Azure AD (Lobomail, UNM Zoom, Office 365, etc.) you will automatically be logged into Qualtrics.
Step 3. If you are not already logged in to UNM systems via Azure AD, you will be prompted to sign in. Enter your full UNM email address (e.g.,
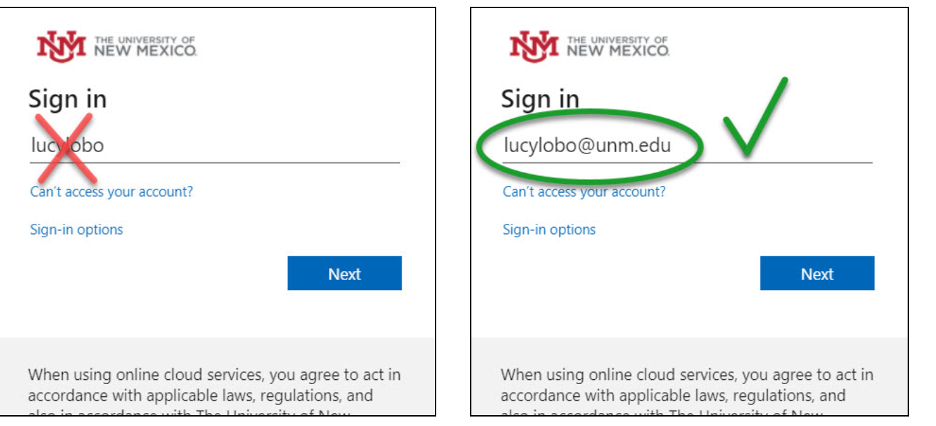
Step 4. Enter your password. 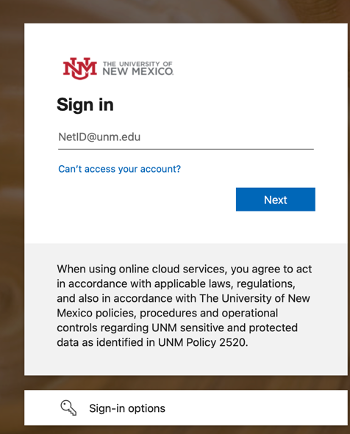
Step 5. Approve Multi-Factor Authentication (MFA) sign in request (via text, call or Authenticator app). 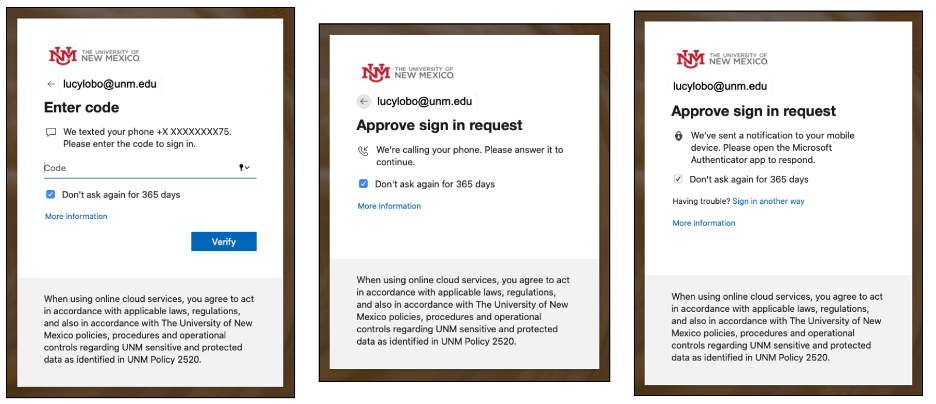
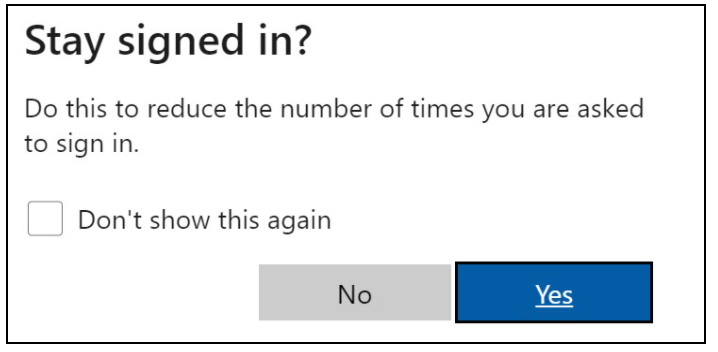
Step 6. If you select “Yes” on “Stay signed in,” the Azure AD system will set your session to be valid for 90 days or until you logout or change your password. If you select “No,” your session will be valid for 24 hours or until the browser window is closed.
Microsoft Errors
If you receive the Microsoft "Sign-in is blocked" error (below), then you have made too many invalid login attempts and your account has been temporarily locked. The lockout time is generally 1 minute (more if you keep making invalid attempts). Please confirm you are logging in with your correct password and full UNM email address (e.g. <netid@unm.edu>), not just your NetID or Salud email.
If you still have problems, consult the article below. It provides additional information, including steps for getting support from the Main IT helpdesk.
Qualtrics Vendor Support
To contact Qualtrics support follow these steps:
Step 1. Go to https://Qualtrics.com/support-center
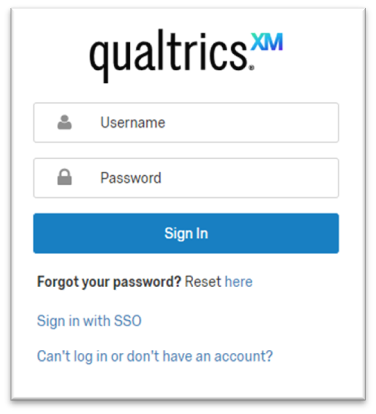
Step 2. Click " Sign in with SSO".
Step 3. Enter "unm" as the Organization ID.
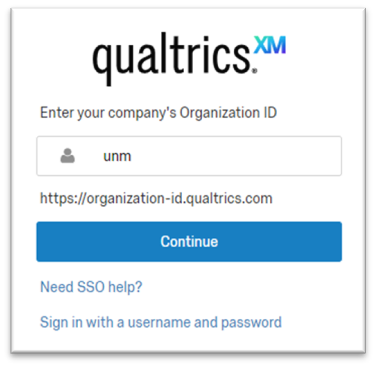
Step 4. Click " Continue".
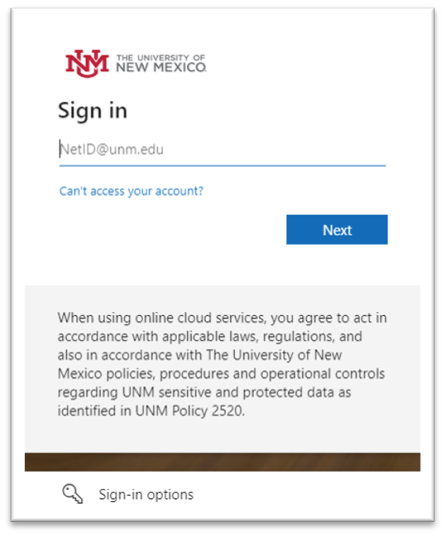
Step 5. Login with your UNM NetID credentials, if not logged into the browser.
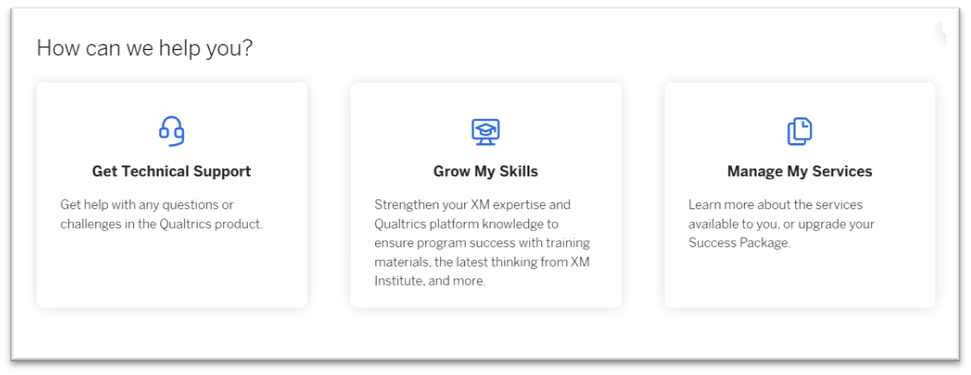
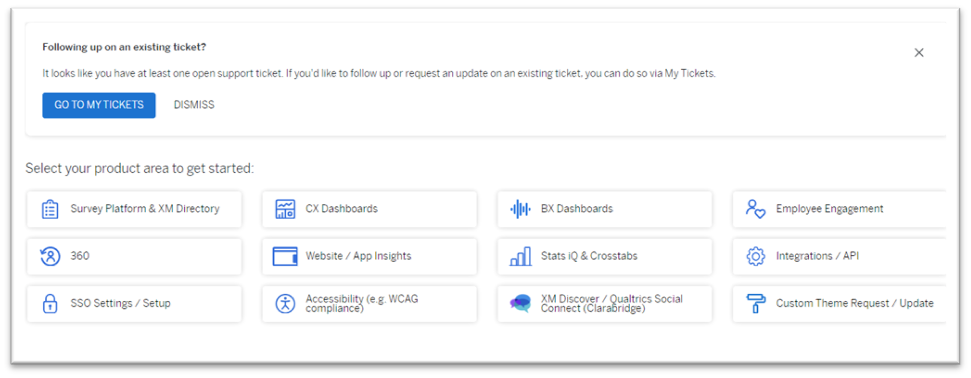
Step 6. Once logged in, you will see three options on the main screen. Select “ Get Technical Support”.
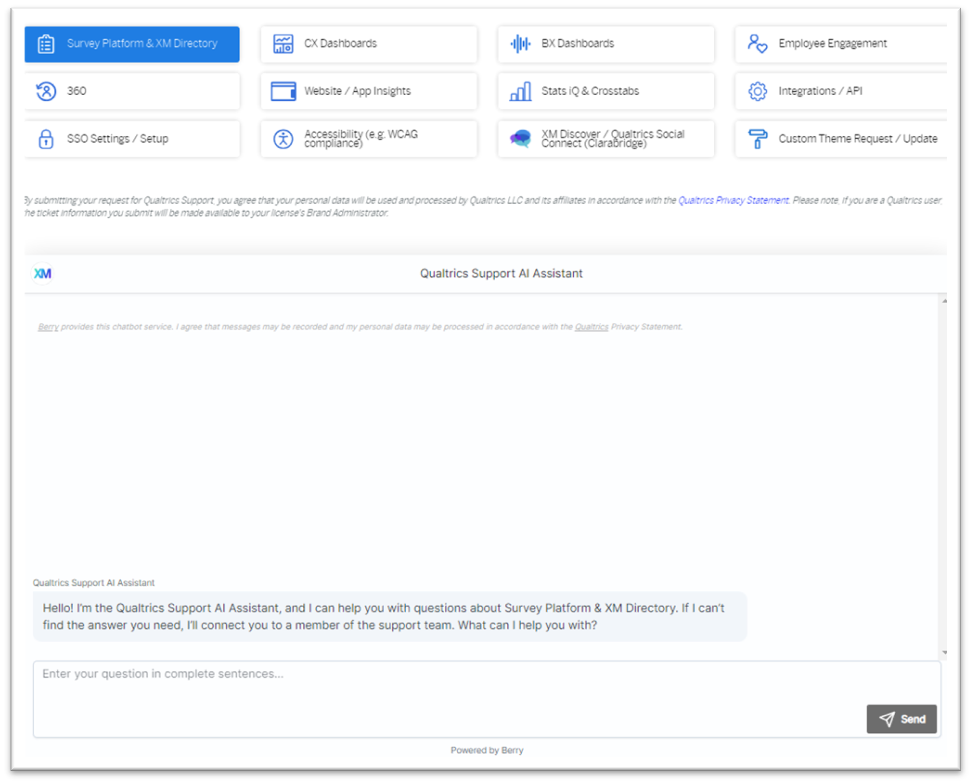
Step 7. Select “ Survey Platform & XM Directory” or other option as needed.
Step 8. Ask your question to Qualtrics Support AI Assistant.
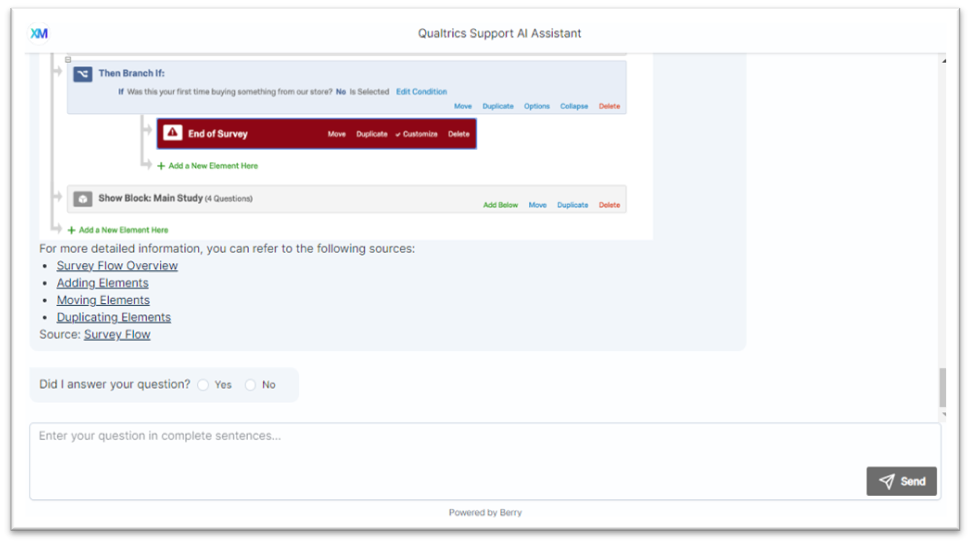
Step 9. If Qualtrics Support AI Assistant is unable to answer your question, select option “ No”.
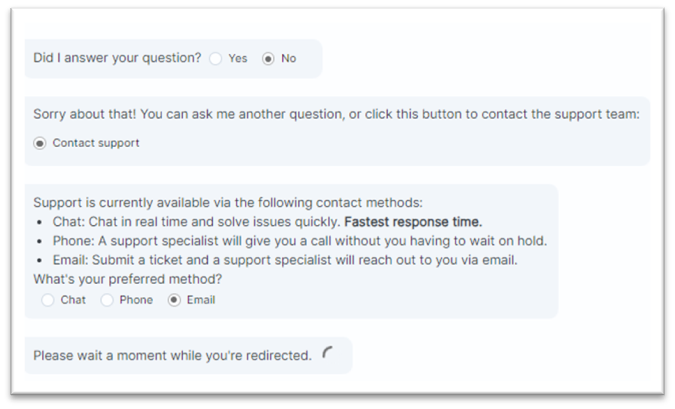
Step 10. Select “ Contact Support” and select “ Email” or any preferred method available.
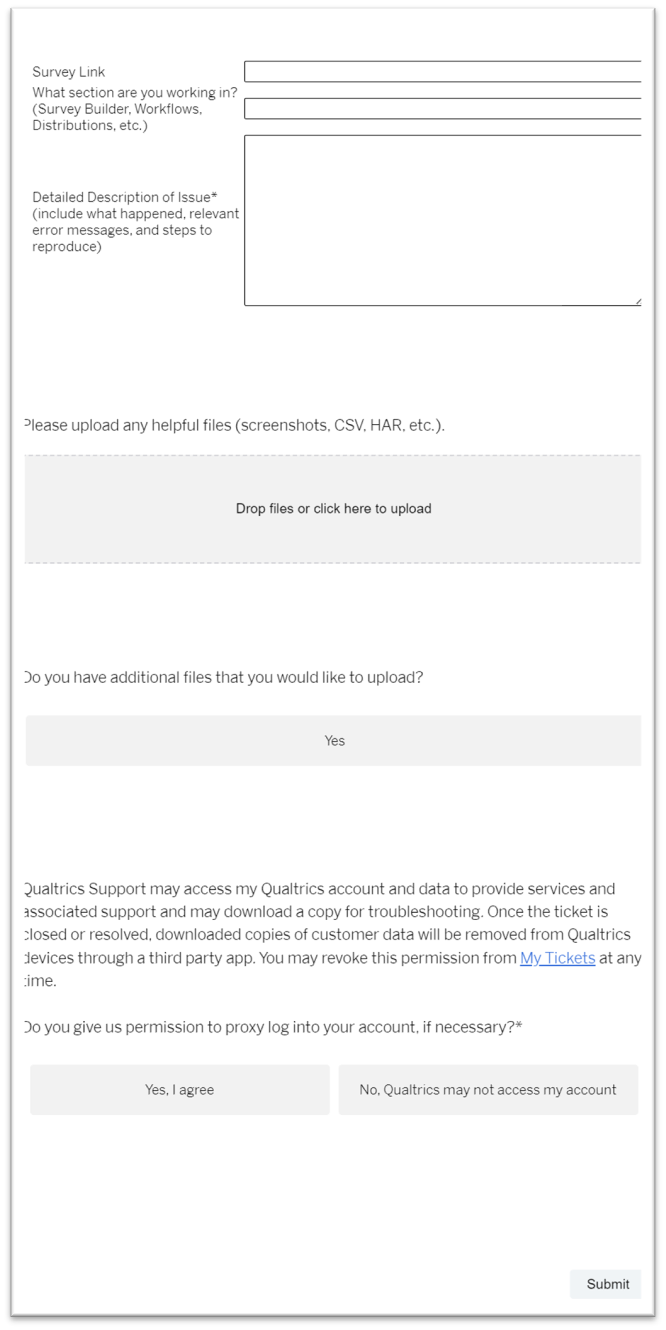
Step 11. It will direct you to the new page for Qualtrics vendor support. Enter the details.
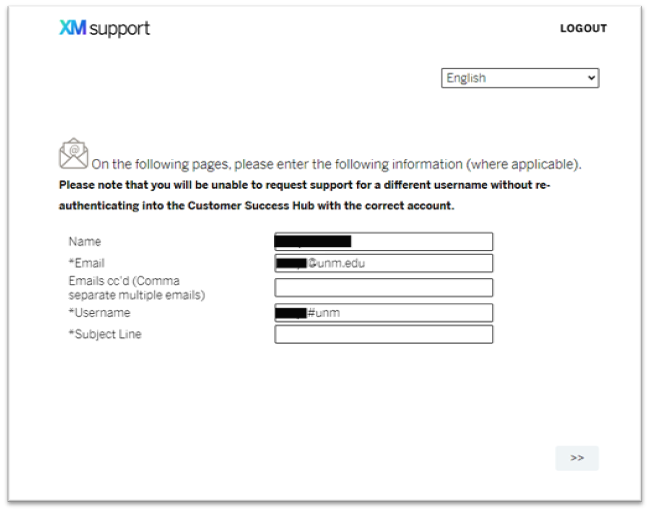
Step 12. Enter the details and click “ Submit”.
If you receive an error similar to “Sorry, but we’re having trouble signing you in… The signed in user email is not assigned to a role for the application” the issue may be caused by your HSC NetID credentials being cached in your browser. If you receive this error, your choices are:
- Use a browser second browser (e.g. Chrome, Firefox, Edge, Safari), one that is different from the one used to access the HSC applications. For example, if you use Chrome for HSC applications, use Firefox for Qualtrics and non-HSC applications, etc.
- Open and use a Private/inPrivate/Incognito browser window in your current browser. For most browsers, you can do this by clicking on the three dots or three dashes in the upper-right corner of the browser window. For Safari, select File > New Private Window.
- Log out of your current HSC Azure session, so you can log into the Main Campus Azure AD. You may need to clear your cache and cookies (in Safari->Clear history).

